
If you’re a Meraki customer, you can use our integration with the Cisco Meraki Scanning API to enable Basking’s software for your locations. We provide a cloud to cloud integration that is easy to set up and secure.
The following article explains how to set up the Basking Cisco Meraki integration using the Scanning APIv2. The integration with the Scanning APIv3 is explained in Cisco Meraki Scanning APIv3 Configuration.
Requirements for the Integration:
Integrating Basking with Meraki is straightforward. All you need to get started is:
- Admin access to Meraki’s admin dashboard.
- Basking’s URL for each Network that has to be configured.
- A secret provided by Basking.
- Provide the Validator to Basking.
Integration Steps
Here are the steps for integrating Basking to your existing Meraki dashboard:
- Open the Meraki Dashboard, and navigate to Network Wide > General settings
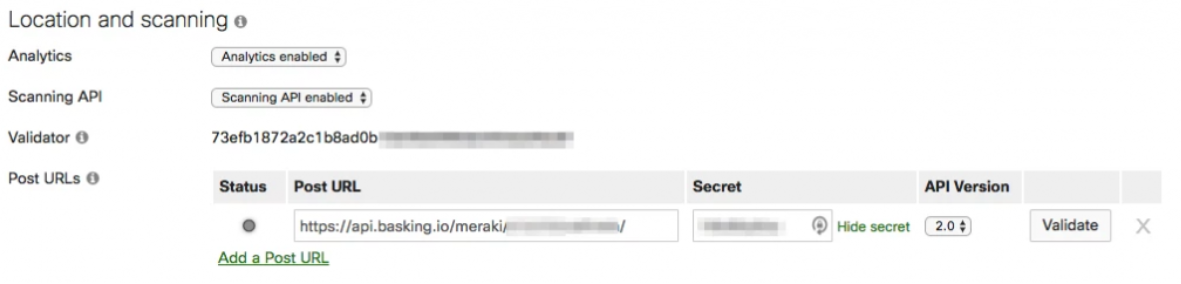
- Turn on the API by selecting Scanning API enabled in the dropdown box
- Note the validator and send to Basking
- We’ll come back with the URL and a secret
- Fill in the URL: “https://meraki.connect.basking.io/XXXXXXXX/“. Please mind the final “/” in the URL, it is mandatory
- Fill in the secret
- Choose WiFi From the Dropdown menu
- Select API Version 2.0. Note: for V3 see our Scanning APIv3 guide.
- Repeat steps 5-8, but selecting Bluetooth instead of WiFi.
- Save the changes in the Meraki dashboard.
- Finally, validate the Post URL status by clicking on the “validate” button for WiFi and Bluetooth. You will see, after a short time, that the Status lamp should be green, confirming that the connection has been successful.
Tags: cisco-meraki Integration scanningapi_v2